
Before you start designing in SOLIDWORKS, I recommend setting up the System Options.
A well-prepared environment lets you skip some steps, avoid mistakes, and reduce the strain on you. In short, it makes design work more efficient.
This article explains the SOLIDWORKS System Options, focusing on the settings that improve usability.
The settings are simple, and you can finish them in about five minutes. I hope you will give them a try.
If you want to make SOLIDWORKS itself run lighter, see the article below.
» SOLIDWORKS Performance Optimization: Settings to Make SOLIDWORKS Run Faster
What Are System Options?
System Options are settings that apply every time you use SOLIDWORKS.
With them, you can switch many of the features, behaviors, and tools built into SOLIDWORKS on or off.
If you tune the System Options well, you get benefits like these:
- Simpler operations mean less mouse movement, which saves working time.
- It is easier to see what changed and what you are editing, which helps prevent mistakes.
- Fewer missed checks and careless mistakes make your work more stable.

When your System Options are tuned, there is less stress in your work, and design becomes more enjoyable.
Setting Up System Options
To open the System Options, choose Tools > Options.
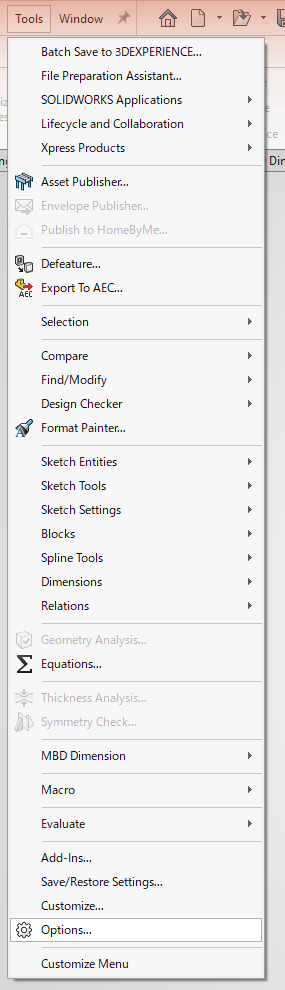
Below are my recommended settings for better usability.
Depending on your version of SOLIDWORKS, some of the options in this article may not exist, or their names and positions may differ. If you cannot find an item, you can simply skip it.
The settings in this article put usability (ease of work and accuracy) first.
Some settings improve usability when you switch them on or off (or choose a particular value), but they make processing take longer, which can lower your efficiency overall. I mark those with [Your call] at the start of the item, and explain the trade-off.
If you would rather give up some convenience for faster processing, see this article instead:
» SOLIDWORKS Performance Optimization: Settings to Make SOLIDWORKS Run Faster
There is no single right answer. Decide based on the size of your models, the specs of your PC, and your own priorities.
System Options > General
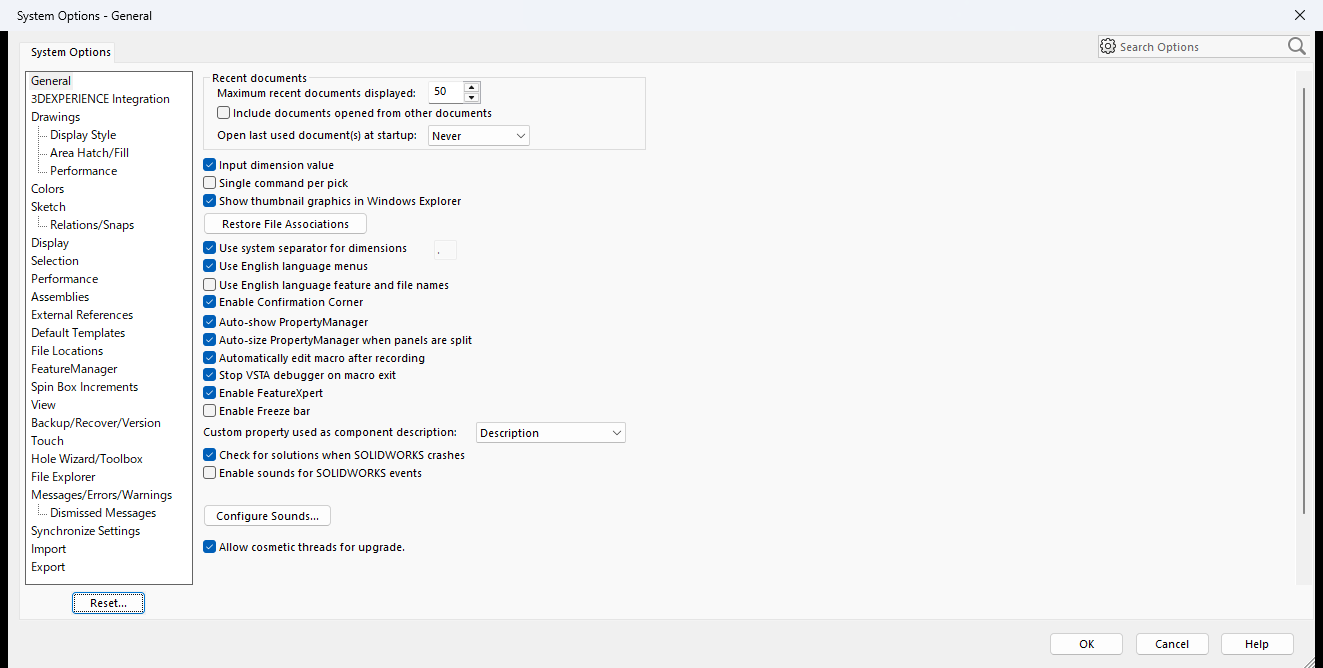
- Select “Input dimension value”
When this is selected, a box for typing the dimension value appears as soon as you place a dimension (SOLIDWORKS calls it the Modify box).
You can enter the value right after placing the dimension, which makes the work more efficient.
- Select “Automatically edit macro after recording”
The Visual Basic editor opens right after you record a macro, so you can edit it immediately.
When you create a macro, the main flow is to record it and then edit the VBA, so selecting this makes macro editing smoother.
- Clear “Enable sounds for SOLIDWORKS events”
Do the notification sounds that play with every operation bother you?
Event sounds are not essential, so turning them off helps you stay focused without being distracted by extra noise.
- [Your call] Select “Show thumbnail graphics in Windows Explorer”
You can check a file’s shape from its thumbnail in Windows Explorer without opening the file.
In exchange, SOLIDWORKS has to generate and display the thumbnails, which can make the display slower.
System Options > Drawings
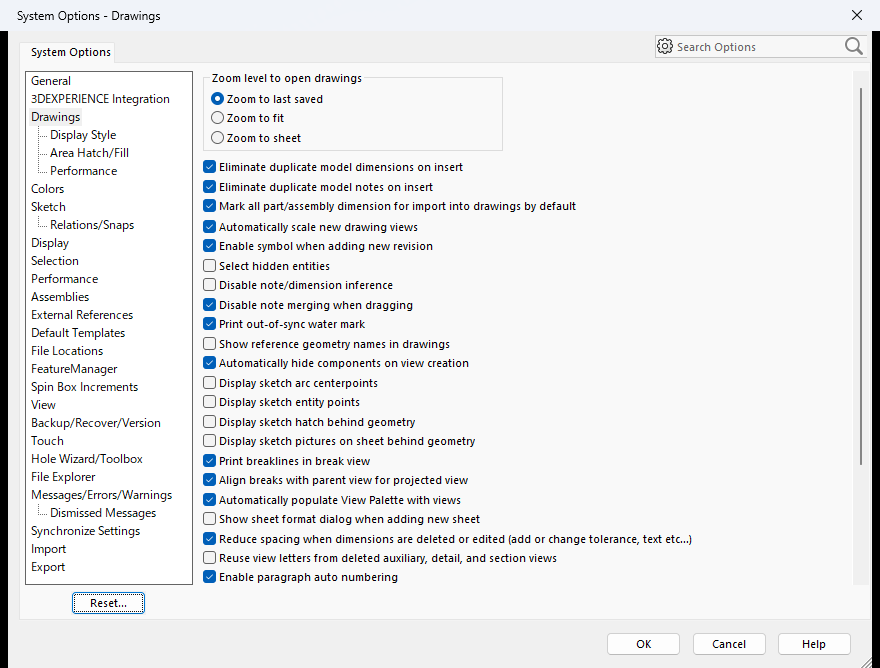
- Clear “Disable note/dimension inference”
When you place a note or dimension, SOLIDWORKS shows guide lines that line it up horizontally or vertically with the notes and dimensions already on the sheet.
This makes it easier to produce a neat-looking drawing.
- Select “Print out-of-sync water mark”
If a drawing has not been updated to match its 3D model, a watermark saying so is printed on the drawing.
This helps you avoid issuing a drawing that no longer matches the model without noticing.
- Clear “Reduce spacing when dimensions are deleted or edited (add or change tolerance, text etc…)”
This stops other dimensions from moving on their own when you delete or edit a dimension on the drawing.
- Select “Reuse view letters from deleted auxiliary, detail, and section views”
Suppose you have “Detail A” and “Detail B”, delete “Detail A”, and then create a new detail view. With this setting off, the new view gets the next letter, “Detail C”, and the lettering ends up with gaps that make the drawing harder to read.
With the setting on, the free letter “A” is used again, so the labels run in order with no gaps.
System Options > Drawings > Performance
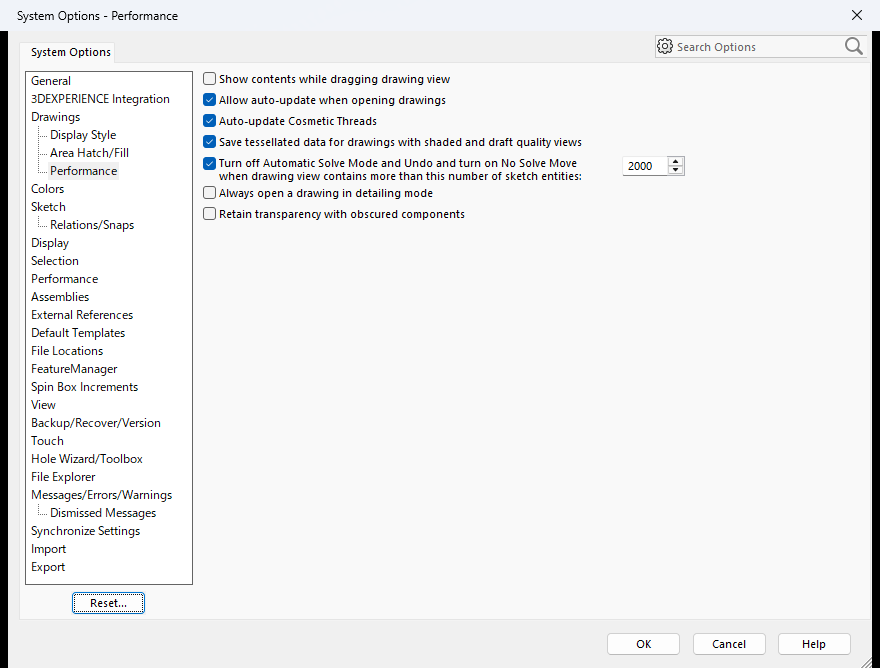
- [Your call] Select “Allow auto-update when opening drawings”
When you open a drawing, changes made to the model are reflected automatically. This helps you avoid the mistake of forgetting to update and issuing a drawing whose shape differs from the 3D model.
On the other hand, an update always runs when you open the drawing, so opening files takes longer.
System Options > Colors
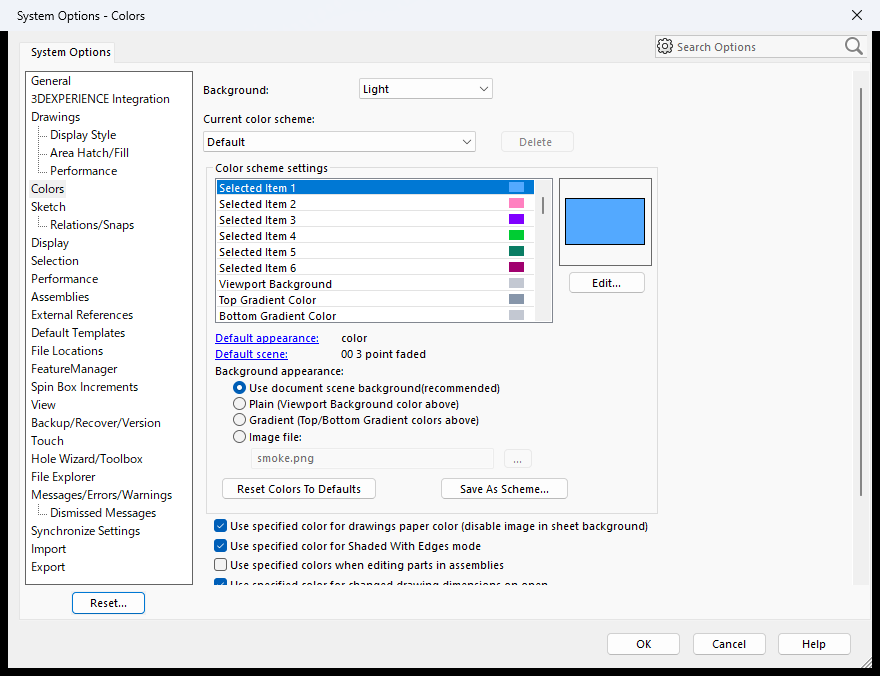
- Select “Use specified color for changed drawing dimensions on open”
You can see the design changes at a glance, even if the drawing and the model were not open at the same time.
If you change and save the model while the drawing is closed, and then open the drawing, the changed dimensions are shown in the specified color. (If you hover over one, you can also see its previous value.)
When you save the drawing and reopen it, the dimensions return to their normal color.
- Change the background to your liking
The Background list lets you choose how light or dark the screen is.
A change in screen brightness can help reduce eye strain during long working hours. Try it and set what suits you.
When changed dimensions are easy to spot, you are less likely to make mistakes or miss a check. Item 11 is purely a matter of taste, so any choice is fine.
System Options > Sketch
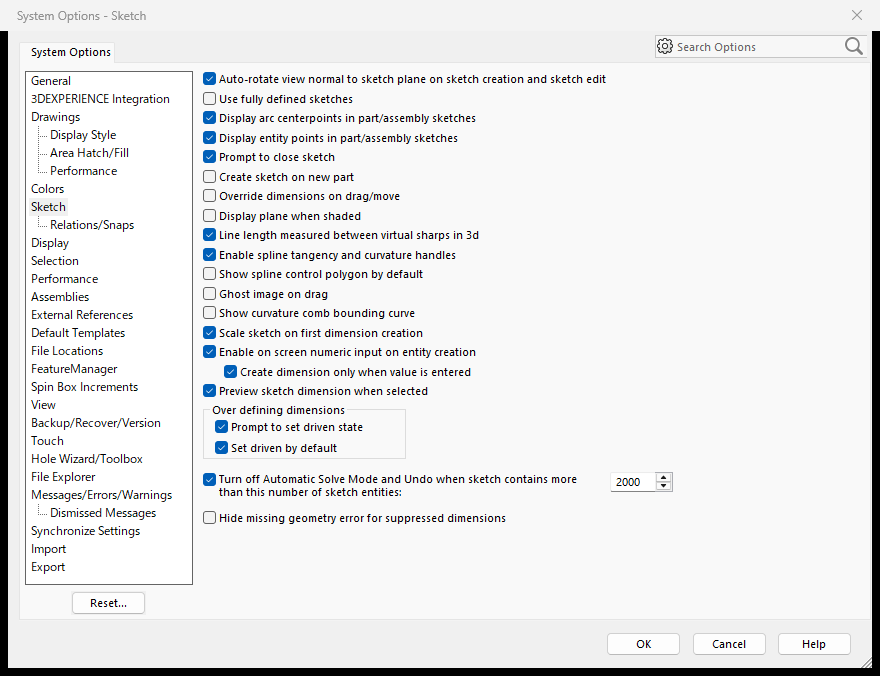
- Select “Auto-rotate view normal to sketch plane on sketch creation and sketch edit”
The view turns automatically so that you look straight at the sketch plane, which makes planar sketching easier.
- Clear “Use fully defined sketches”
When this is selected, you cannot exit a sketch until its dimensions and relations are fully defined.
That helps you avoid forgetting to fully define a sketch (black lines). But in real work there are times when you want to leave a sketch Under Defined (blue lines), so I clear this option.
- Select “Scale sketch on first dimension creation”
When you add the first dimension to a rough sketch, the whole sketch is scaled to match that dimension value.
With the option cleared, entering the first dimension changes only that part, and the proportions against the rest of the sketch can break and distort the shape.
With it selected, you can draw the shape first and then set the size all at once with the first dimension.
- Select “Enable on screen numeric input on entity creation”
- Select “Create dimension only when value is entered”
These two settings go together. With them selected, you can enter a dimension and set its value while you are still drawing the sketch.
Normally you draw a line, add a dimension with Smart Dimension, and then type the value. With these settings you can enter the dimension as you draw the line, which shortens sketching time.
- Select “Preview sketch dimension when selected” (available in SOLIDWORKS 2024 and later)
You do not need a dimension command: just select a sketch entity, and a preview of its dimension appears that you can click to type a value.
This lets you dimension and constrain sketches efficiently and intuitively.
System Options > Display
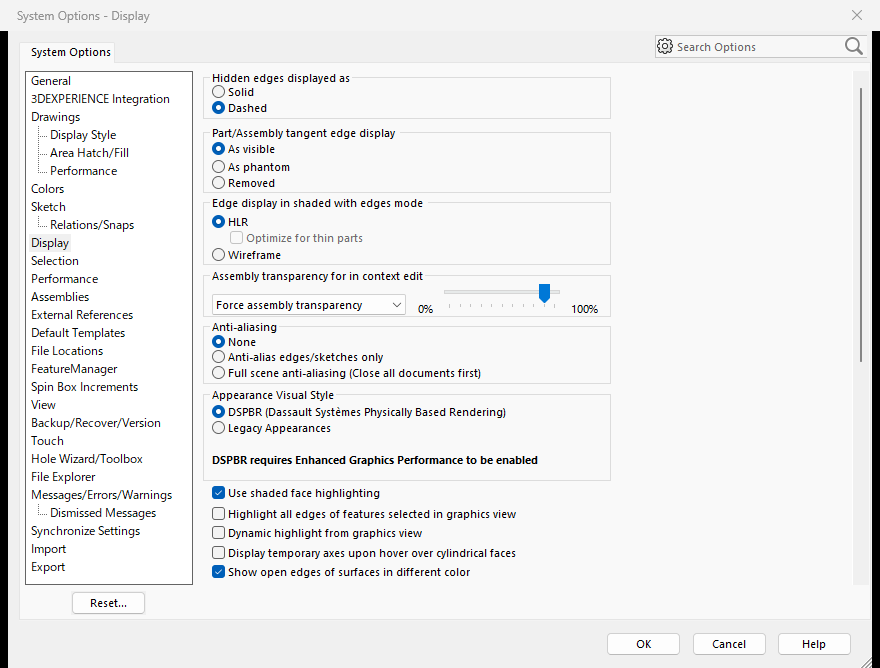
- [Your call] Select “Dynamic highlight from graphics view”
This highlights an edge or face when you move the mouse cursor over it, before you click.
The highlight is calculated in real time every time the cursor moves, so with large assemblies and other heavy models it can make the display stutter.
System Options > Performance
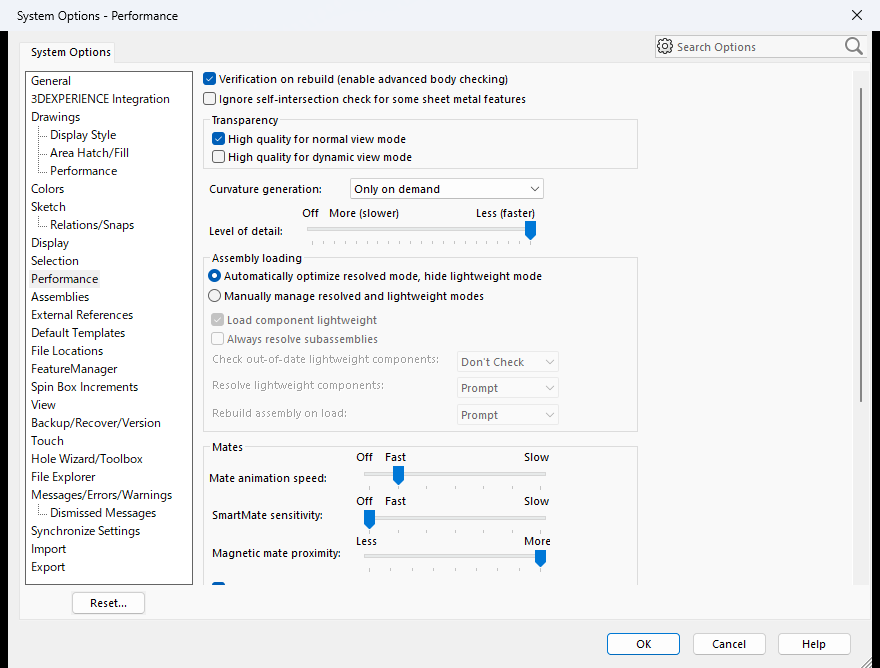
- [Your call] Select “Verification on rebuild (enable advanced body checking)”
Every time the model is rebuilt, SOLIDWORKS runs an additional check for problems such as inconsistent geometry. You can catch model problems early, which helps you avoid designing on without noticing them.
The time taken by that check is added to every rebuild.
- [Your call] Set “Mate animation speed” to Fast
When you apply a mate in an assembly, you can watch the animation of how the part moves into position. Because you can see whether it assembled in the intended orientation and position, you are less likely to miss a wrong mate.
If the operation feels sluggish, turning the animation off may improve performance.
System Options > Assemblies
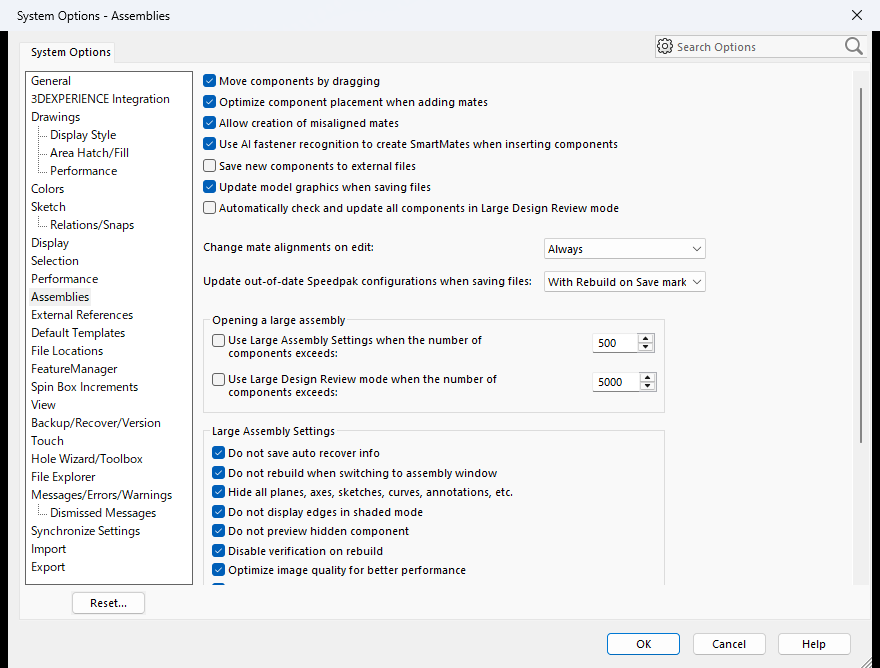
- Select “Move components by dragging”
Within the remaining degrees of freedom (the directions the part can still move), you can drag a part or subassembly with the mouse to move it.
You do not have to call up a move command each time, so you can move parts intuitively.
- [Your call] Select “Update model graphics when saving files”
This updates the model’s display data (graphics data) to the latest state whenever you save an assembly.
If that display data is out of date, you may see the pre-change shape when you open the assembly in lightweight mode (a mode that loads only part of each component’s data so it opens faster), or in another viewer such as eDrawings.
With this selected, the data is refreshed at every save, which helps prevent the mismatch of opening a file and finding an old shape. Refreshing the data at every save may add to the save time, so decide based on how large your assemblies are.
System Options > External References
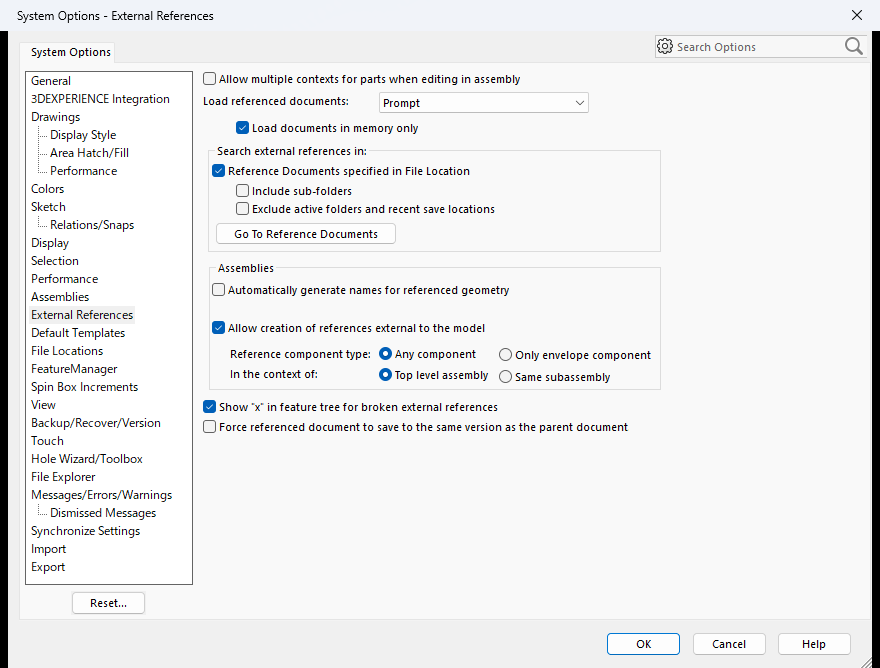
- Clear “Don’t prompt to save read-only referenced documents (discard changes)”
You may edit a file without noticing that it was opened read-only.
With this option cleared, SOLIDWORKS warns you that the file is open read-only, which helps you avoid losing the edits you made.
- Select “Update component names when documents are replaced”
When you swap a part in an assembly with the Replace command, the name in the tree is updated to the new file name automatically.
- Clear “Force referenced document to save to the same version as the parent document.”
Suppose you open and save an assembly made in an older version of SOLIDWORKS. With this option selected, all the parts and subassemblies in the assembly are converted to the current version and saved, including files you did not edit.
With the option cleared, only the files you edited are saved in the current version, and the referenced files you did not touch stay in their original version.
This can shorten save times. It also helps when you share files with someone who uses an older version of SOLIDWORKS: you will not accidentally upgrade a file to a version they cannot open.
System Options > FeatureManager
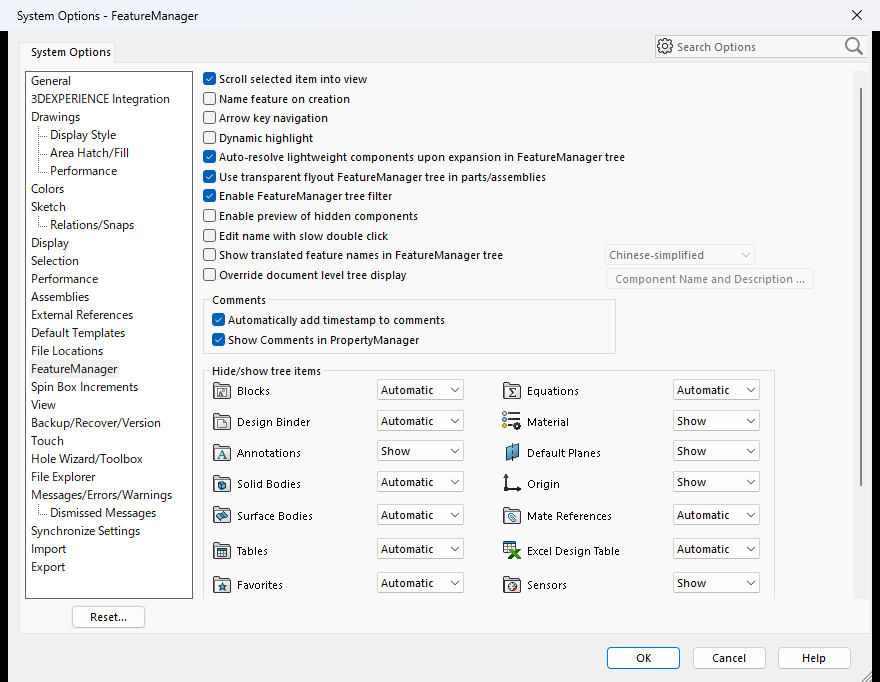
- Select “Scroll selected item into view”
When you click a part or face in the 3D model, the matching item in the FeatureManager design tree (the list of parts and features on the left side of the screen) scrolls into view and is highlighted.
In an assembly, you do not have to hunt for “which part in the tree is this?”
- [Your call] Select “Dynamic highlight”
When you move the mouse cursor over an edge, a face, or an item in the FeatureManager design tree, the target is highlighted before you click.
It helps you avoid mistakes such as clicking and finding you selected a different face than you meant.
However, the highlight is calculated in real time every time the cursor moves, so SOLIDWORKS can become sluggish.
System Options > View
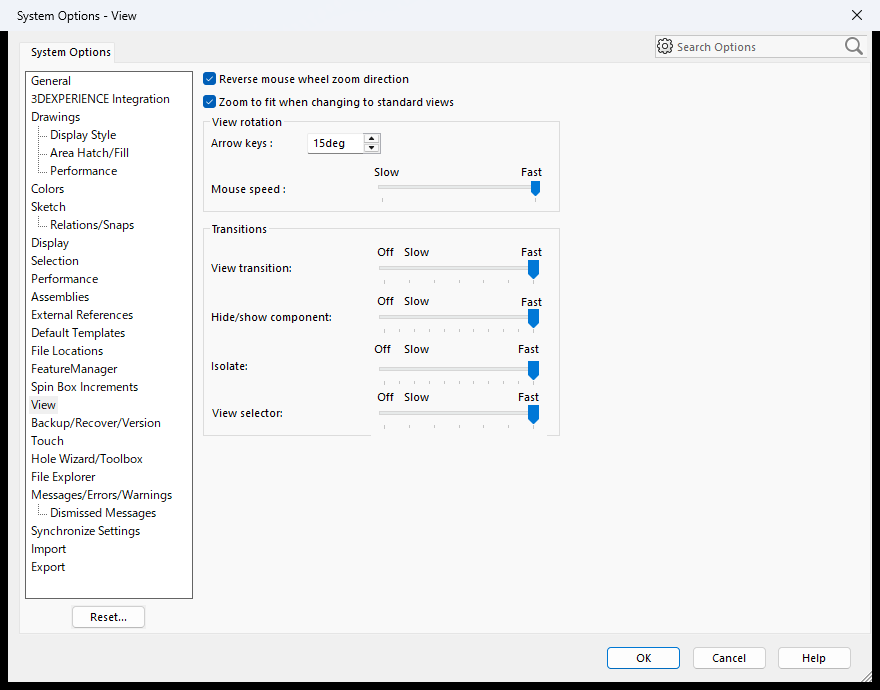
- Select “Reverse mouse wheel zoom direction”
Turning the mouse wheel zooms a 3D model or a drawing in and out.
The default zoom direction in SOLIDWORKS may feel opposite to what you are used to in other apps, such as Excel, so some people find it awkward.
If you select this option, the wheel direction can match those apps, which makes it easier to use. (Which direction feels natural is a matter of habit, so skip this if the default suits you.)
System Options > Backup/Recover/Version
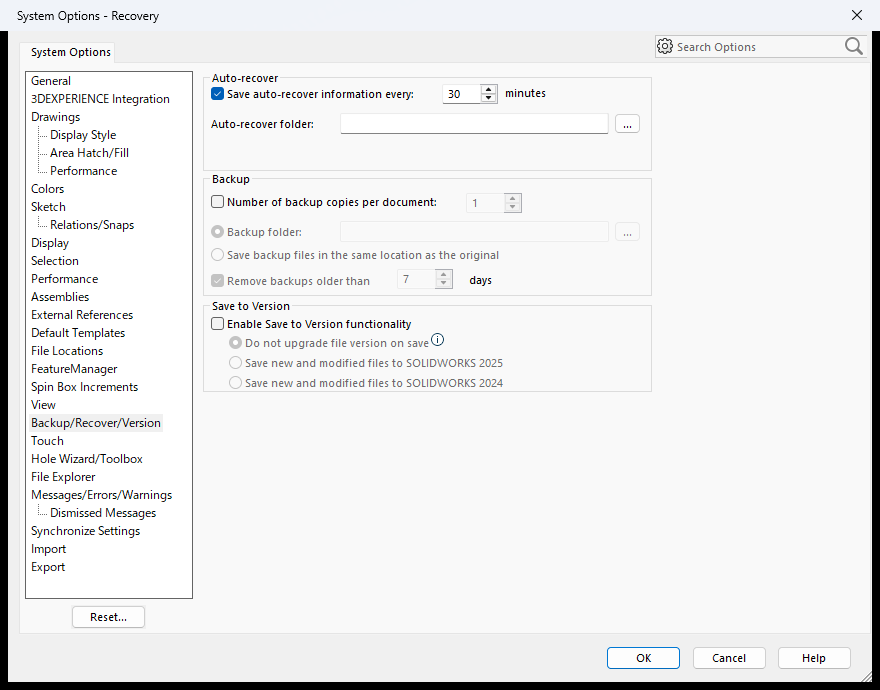
- Select “Save auto-recover information every:” and enter the interval you want
When you work with several large files open, or run complex operations, SOLIDWORKS can crash or freeze.
To protect the file you are editing in such cases, I recommend saving auto-recover information.
Unfortunately, SOLIDWORKS can freeze or shut down unexpectedly.
I set mine to 20 minutes, since I can live with redoing about that much work, including the mental cost.
Each auto-save makes SOLIDWORKS slower for a moment, so do not set the interval too short.
Even with auto-save enabled, there are cases where nothing is saved automatically.
Saving as you edit is the best protection.
System Options > Messages/Errors/Warnings
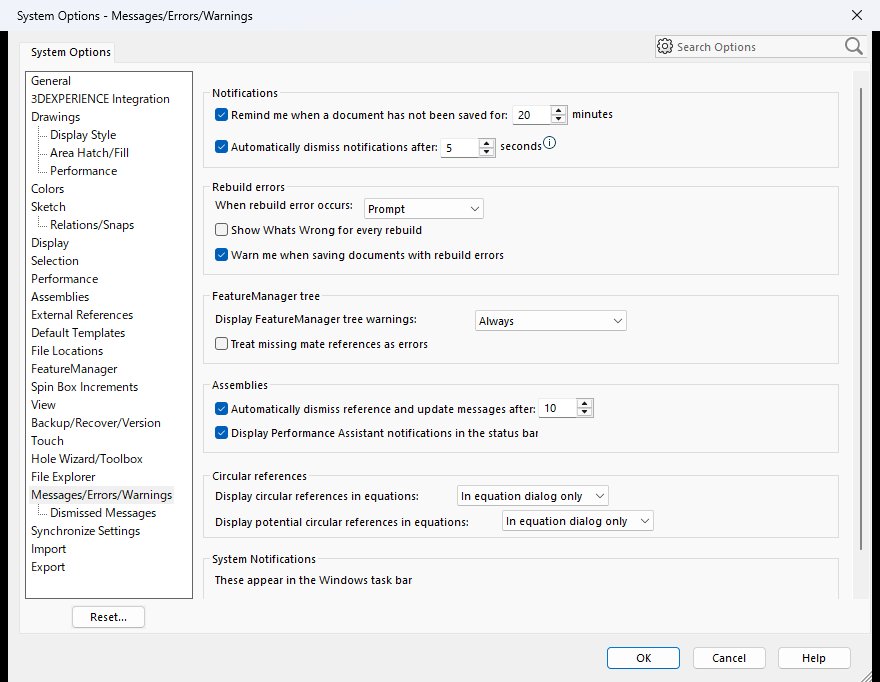
- Select “Remind me when a document has not been saved for:” and enter the time you want
- Select “Automatically dismiss notifications after:” and enter the time you want
If you keep editing a file and the time you entered passes without a save, a message prompting you to save appears at the lower right of the screen.
This reminder should not cost as much as saving auto-recover information, so a shorter interval than the auto-save interval should be fine.
The messages can feel a little annoying, but they keep you from forgetting to save, so I recommend setting them up.
Honestly, they do not get in the way much.
Bonus: Document Properties
Finally, here is a setting that helps prevent mistakes with overridden dimensions.
Document Properties are set from the Document Properties tab of Tools > Options. Open a file first, and then set the Document Properties.
- Select the option that highlights overridden dimensions in a different color (found on the Dimensions page; available in SOLIDWORKS 2024 and later)
Overridden dimensions (dimensions whose displayed value has been typed over instead of measured from the model) are shown in a different color. You can see at a glance which dimensions are temporarily or provisionally overridden, which helps you avoid unpleasant surprises.
Used together with the System Options > Colors settings, this makes changes even easier to spot.
Summary
This article explained the SOLIDWORKS System Options, especially the settings that improve usability.
Setting up your environment before you start real design work can reduce effort and help prevent mistakes.
If you have recommended settings that I did not cover, I would be glad if you shared them in the comments.
If you care more about the processing speed of SOLIDWORKS itself than about usability, see this article: SOLIDWORKS Performance Optimization: Settings to Make SOLIDWORKS Run Faster
Thank you for reading to the end.










This article recommends settings from two angles: cutting down on the number of operations, and preventing input mistakes and missed checks.
A few of the settings trade off against processing speed, so I list their pros and cons.