
When you model and draw in SOLIDWORKS, I recommend getting to know mouse gestures.
With mouse gestures, the cursor travels a much shorter distance to reach a command, so you spend less time reaching for toolbars. That may also take some load off the wrist that handles the mouse.
Mouse gestures already work with the default settings. But if you put the commands you use most into them, they become far more useful.
This article explains how to set up mouse gestures, and shows the setup I use myself.
The setup itself takes only a few minutes.
Let’s get started.
What Are Mouse Gestures?
Mouse gestures are a feature that appears when you right-drag (hold the right mouse button and move the mouse) in the SOLIDWORKS graphics area, the large area where your model is displayed.
A ring of command buttons (the mouse gesture guide) appears around the cursor. Just slide the cursor toward a button, and that command starts.
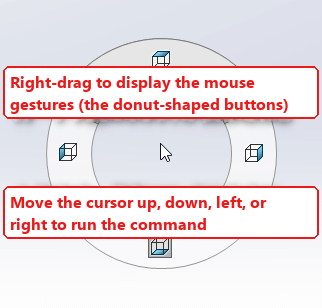
With the default settings, the mouse gestures in a part or assembly look like the figure above.
If you put your frequently used commands into mouse gestures, you no longer have to move the mouse all the way to the toolbar every time. That saves time.
Mouse work also adds up over a day of design. Some people report wrist problems from heavy mouse use, and fewer long cursor movements may help. I do not know how much, but it could be a side benefit.
You can set mouse gestures separately for Part, Assembly, Sketch, and Drawing. (Part, Assembly, and Drawing are document types. Sketch is the mode you are in while editing a sketch.)
This is because each of these has its own commands you use most. You might put Extruded Boss/Base in the part gestures, and Smart Dimension in the sketch gestures.
To me, mouse gestures are one of the handiest features in SOLIDWORKS.
How to Set Up Mouse Gestures
The images in this article are based on SOLIDWORKS for Makers (2022). Other versions can look a little different. For example, in SOLIDWORKS 2017 the dialog was laid out as a grid, and only 4 and 8 gestures were available.
Open the Mouse Gestures Settings
- Open any file in SOLIDWORKS.
- Choose Tools > Customize.
- Click the Mouse Gestures tab. The mouse gesture guide window appears to the right of the dialog.
Here is what each setting does.
1. Turn on mouse gestures
Select Enable mouse gestures. This turns the feature on. (It is probably already selected by default.)
2. Choose the number of gestures
This sets how many commands are arranged around the ring. The default is four.
You can choose from six layouts: 2 gestures (vertical), 2 gestures (horizontal), 3, 4, 8, and 12 gestures. The figure below shows how the commands are arranged in each one.
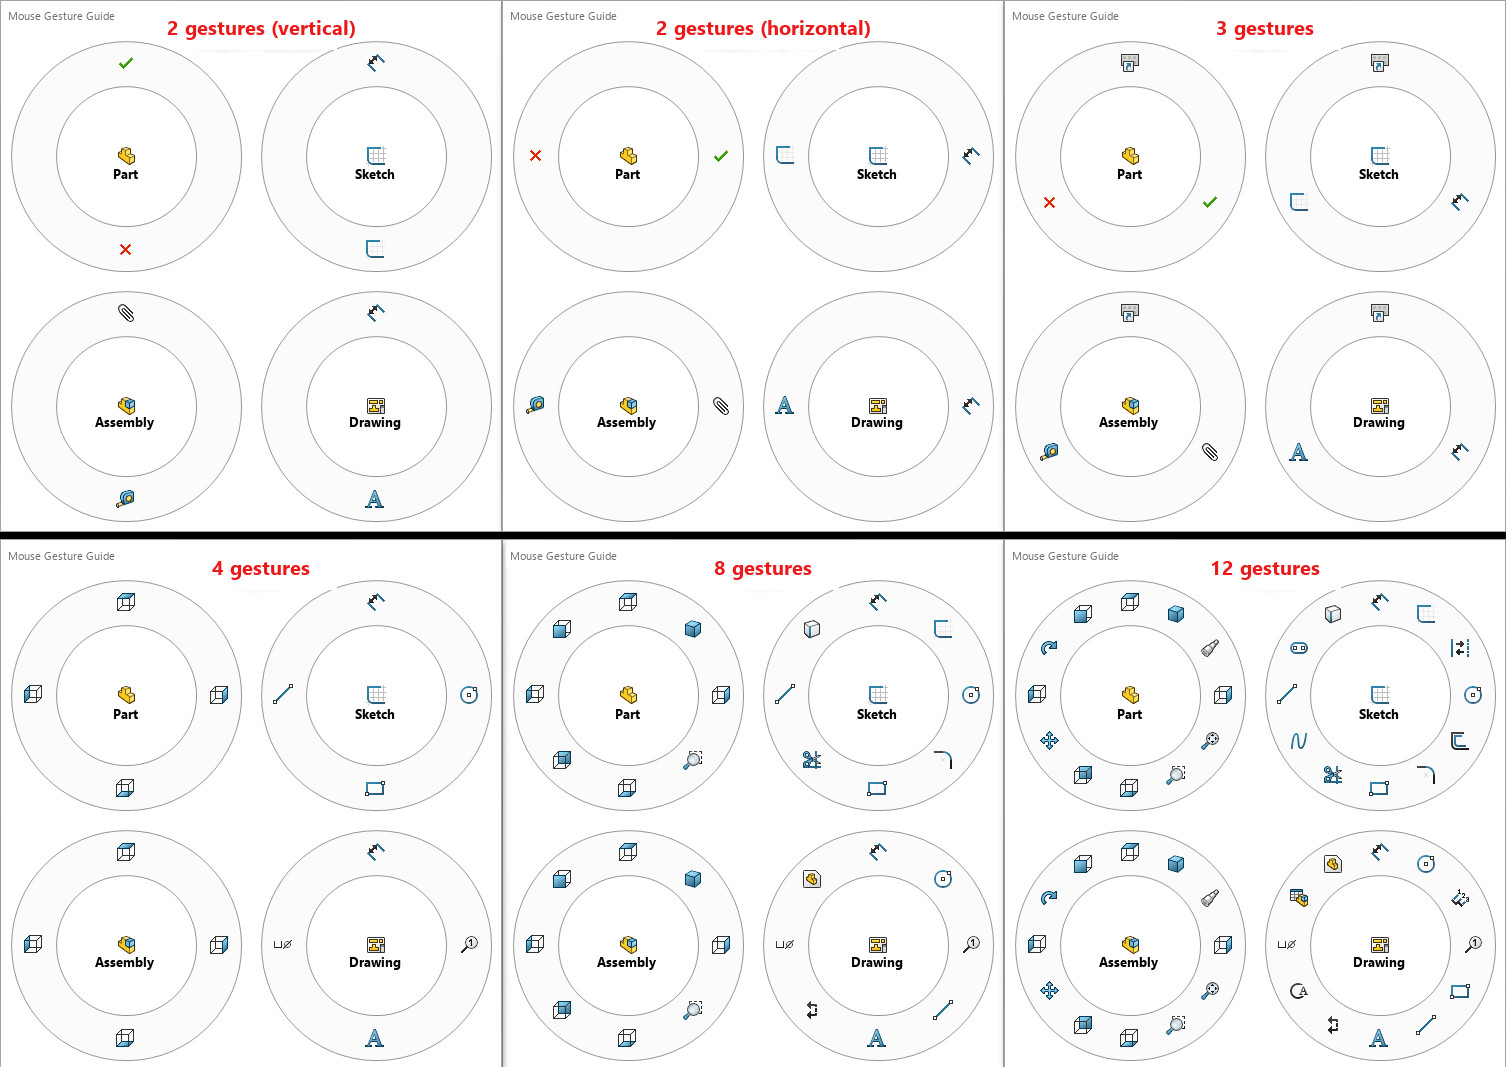
The more gestures you use, the more commands you can reach. But it takes longer to get used to them, and you are more likely to pick the wrong one.
3. Narrow the command list by category
The list of commands on the left shows every command available in SOLIDWORKS when the category is set to all commands.
If there are too many commands and you cannot find the one you want, change the category (or use the search box). The list narrows down and becomes easier to scan.
4. Drag a command onto the guide
From the list, drag the command you want and drop it on the position you want in the mouse gesture guide on the right. If you drop it on an empty position, the command is added. If you drop it on an occupied position, it replaces the command that was there.
Do this for each of Part, Assembly, Sketch, and Drawing to build the layout you want.
5. Click OK
Click OK to finish.
My Recommended Mouse Gesture Setup
Here is the setup I use. If you are not sure which commands to assign, or you do not want to spend time deciding, feel free to copy it. If you already use mouse gestures, I hope it gives you some ideas for your own.
I Recommend Starting with 4 Gestures
I recommend starting with 4 gestures.
In my opinion, four commands are enough to be useful, and the layout leaves room to grow. Two or three gestures feel a little limiting, while eight is a lot of positions to memorize.
With four gestures, you learn the positions as you use them. Soon you can start a command before the guide even appears, and move quickly through modeling and sketching.
Four gestures use only vertical and horizontal movements. Even if two gestures would be enough for you, setting up four costs little, and straight up, down, left, and right movements are easy to tell apart, so you are less likely to trigger the wrong one than with diagonal movements.
If you later want more commands, you can move up to eight gestures, which adds the 45-degree diagonals. If you are already used to four gestures, the switch should go smoothly. (For that reason, I would not choose three gestures.)
Here Is My Setup
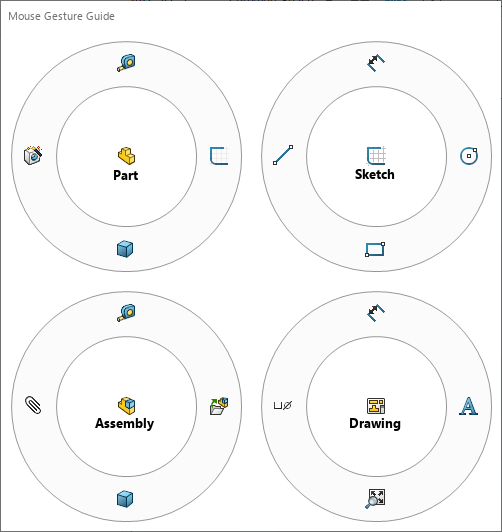
The command in each direction is listed below. (↑ means moving the cursor up, ↓ down, ← left, and → right.)
| Mode | ↑ Up | ↓ Down | ← Left | → Right |
|---|---|---|---|---|
| Part | Measure | Trimetric | Hole Wizard | Sketch |
| Assembly | Measure | Trimetric | Mate | Insert Components |
| Drawing | Smart Dimension | Zoom to Sheet | Hole Callout | Note |
| Sketch | Smart Dimension | Corner Rectangle | Line | Circle |
Here is my reasoning.
Down in Part, Assembly, and Drawing is a view command: Trimetric (an angled 3D view) in a part or assembly, and Zoom to Sheet in a drawing. When I finish looking at one area in detail and want to move on to another, switching to a familiar view first makes it easier to see where to go next.
Up is a dimension or measurement command in every mode. During design work I often check clearances and spaces between parts, so I assigned Measure and Smart Dimension.
For the rest, I assigned commands I tend to use in each mode:
- Part: Sketch and Hole Wizard
- Assembly: Insert Components and Mate
- Drawing: Hole Callout and Note
- Sketch: Line, Corner Rectangle, and Circle
I also tried to put similar functions in the same direction in every mode, so the gestures are easier to remember.
Summary
This article explained SOLIDWORKS mouse gestures: how to customize them, and the setup I recommend.
Once you get used to mouse gestures, they can save you a lot of mouse travel in everyday SOLIDWORKS work. If you have not tried them yet, they are worth a few minutes.
Mouse gesture settings are also quite personal, and they vary from designer to designer.
That is why I am curious about what other people have set up, and which commands they use.
If you have a setup you like, I would love to hear about it in the comments.
Thank you for reading to the end.










Leave a Reply
You must be logged in to post a comment.