For a designer who normally works at a desk in the office, working from a café is an appealing idea.
But if you want to use SOLIDWORKS outside the office, there is a big obstacle.
A PC that runs SOLIDWORKS smoothly is too heavy to carry around, and a mobile workstation is too expensive.
There is, however, a way to keep using the desktop you already have at home, at a low cost and safely.
This article explains how to carry SOLIDWORKS with you using a VPN app called Tailscale and Remote Desktop (the Remote Desktop Protocol, or RDP).
With this setup, you can fix a drawing on a business trip, or do some hobby modeling from the living-room sofa.
If you are interested in working from anywhere, please read on.
A Third Option for Using SOLIDWORKS Away from Your Desk
There are three main ways to use SOLIDWORKS outside the office.
This article covers the third option, using Remote Desktop (RDP).
From a lightweight laptop or tablet, you call up the screen of the high-performance workstation at home and operate it.
That frees you from both the heavy luggage and the big expense.
Tailscale: A Simple, Safe Way to Connect
RDP itself is a standard feature of Windows.
However, exposing it directly to the internet is risky.
To use RDP safely, you need to put proper security around it.
Without it, an attacker may be able to steal your information or take over your PC and accounts.
This is where a VPN (virtual private network) comes in.
A VPN is a technology that builds your own private "tunnel" through the public internet.
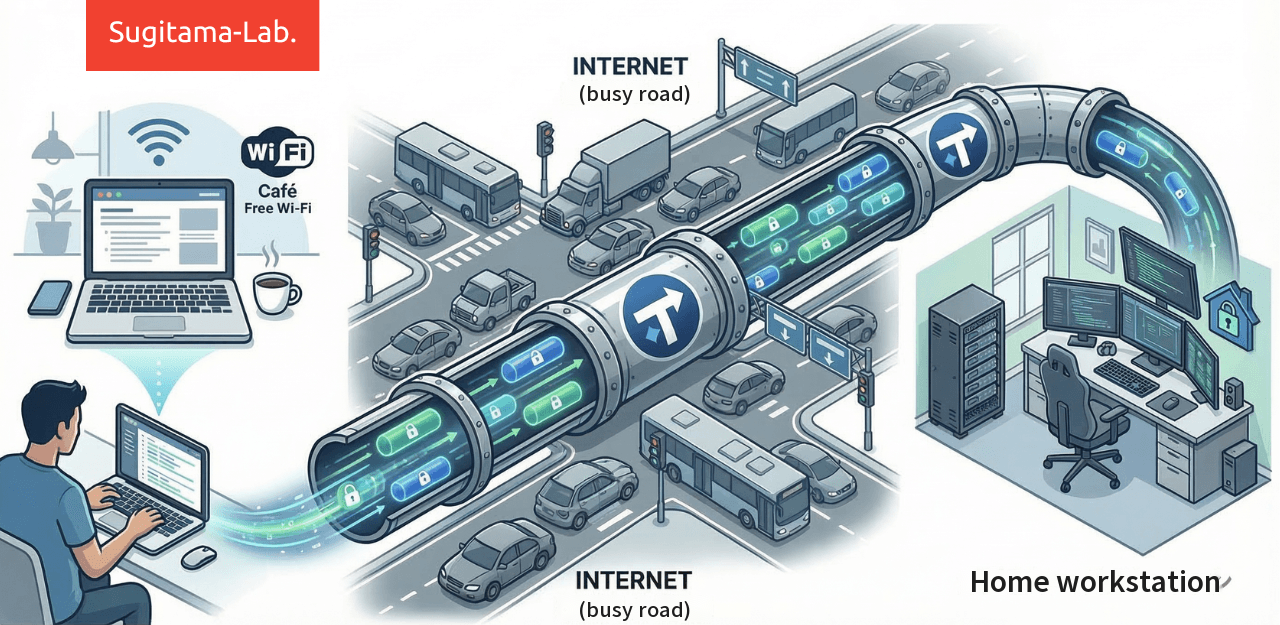
Until recently, building a safe VPN environment on your own was difficult.
Other VPN products exist, but with Tailscale, which I recommend here, you can set up a VPN environment very easily.
- No extra equipment:
No expensive router is needed. You just install the software on the PCs you already have. - No complicated setup:
Port forwarding and other difficult settings are not required. You just install it and log in. - Free for personal use:
Tailscale’s Personal plan is free. For the current limits, see the official pricing page.
With Tailscale, PCs in different places can quickly form a secure network, as if they were connected by a LAN cable in the same room.
Before you start: The free Personal plan is meant for personal use. If you plan to connect a PC that belongs to your employer, check Tailscale’s terms and your company’s IT policy first. Also turn on two-step verification for the Google or Microsoft account you use to log in to Tailscale, because that account is the key to your private network.
Step by Step: Build the Remote Environment with Tailscale
Now let’s build the environment.
- Host PC (the one you control remotely): the workstation at home with SOLIDWORKS installed
- Very important: its edition of Windows must be Pro, Enterprise, or Education. Windows 10 reached the end of support on October 14, 2025, so Windows 11 Pro is the safer choice.
- The Home edition does not include the Remote Desktop host feature, so such a PC cannot be controlled remotely. Check your edition under Settings > System > About.
- If you have the Home edition, you need to upgrade to Pro through the Microsoft Store (paid).
- Client PC (the one you operate from): the laptop you carry
- This can be anything: Windows Home, a Mac, an iPad, and so on.
Step 1: Install Tailscale and Connect
Do the following on both the host PC and the client PC.
- Go to the official Tailscale website, then download and install the app. (On a Mac or iPad, you can also get it from the App Store.)
- Start the app and log in with a Google or Microsoft account, for example.
Use the same account on the host side and the client side. - After you log in, the Tailscale admin console shows the connected PCs. Note the Tailscale IP address of your host PC (it starts with 100.), because you will need it in Step 3.
- Disable key expiry for the host PC in the admin console. By default, each device has to sign in to Tailscale again about every 180 days, and connections stop working until it does. If that happens while you are away from home, you cannot fix it remotely. (See Tailscale’s key expiry documentation.)
- On the host PC, also turn on Run unattended so that Tailscale keeps running even when nobody is signed in to Windows. I explain how in the note near the end of this article.
That is all it takes to open your own private tunnel.
Step 2: Set Up the Home Workstation (Host Side)
Set up the workstation at home so that it accepts remote operation.
(This feature requires the Pro edition or higher.)
- Open Windows Settings → System → Remote Desktop.
- Turn on the Remote Desktop switch, and select Confirm if Windows asks.
- While you are there, check the power settings (Settings → System → Power). If the PC goes to sleep, you cannot connect, so set it not to sleep while it is plugged in.
Step 3: Connect from the PC You Carry (Client Side)
Now it is time to connect.
- On the PC you carry, start Remote Desktop Connection. (It is a standard Windows app. On a Mac or iPhone/iPad, use Microsoft’s Windows App instead.)
- In the "Computer" field, enter the Tailscale IP address of the home workstation (the number that starts with 100.) that you noted in Step 1, then click Connect. (On a Mac or iPad, install Tailscale and sign in with the same account first, then add the 100.x address as a new PC in Windows App.)
- Enter the user name and password of the workstation at home. If you sign in to Windows with a Microsoft account, use that account’s email address and password, not a PIN. A Windows account without a password usually cannot be used for Remote Desktop.
- If a certificate warning appears the first time (it says the identity of the remote computer cannot be verified), it is expected when you connect by IP address. If you are sure the address is your own PC’s, you can continue.
The 100.x address is assigned to the home workstation by Tailscale, and it stays the same even when the device switches networks, so you do not need to look it up every time.
If the connection succeeds, the SOLIDWORKS screen of your home workstation should fill the screen of your laptop.
The standard Windows Remote Desktop (RDP) gives a clear picture, but it is not very good at heavy drawing, such as spinning a model around in SOLIDWORKS.
If it feels choppy and hard to work with, try Parsec, a remote-access app made for gamers, instead of RDP.
It is designed for low latency, so it may make 3D CAD operation feel smoother. Parsec is a separate tool with its own account and settings, so follow its own instructions to set it up. How well either tool performs depends on your PC and your connection, so try both.
Parsec is free for personal, non-commercial use. According to Parsec’s pricing page, commercial use requires a paid plan.
The Physical Problem: How to Turn the PC On
The last big obstacle when building a remote-work environment is this.
How do you press the power button of a PC in an empty house or office?
You want to turn the PC on remotely, only when you need it. You can do that by combining a smart plug with a setting in the PC’s BIOS (the firmware setup screen that you can open before Windows starts).
Once this is set up, your remote-work environment is complete.
How It Works
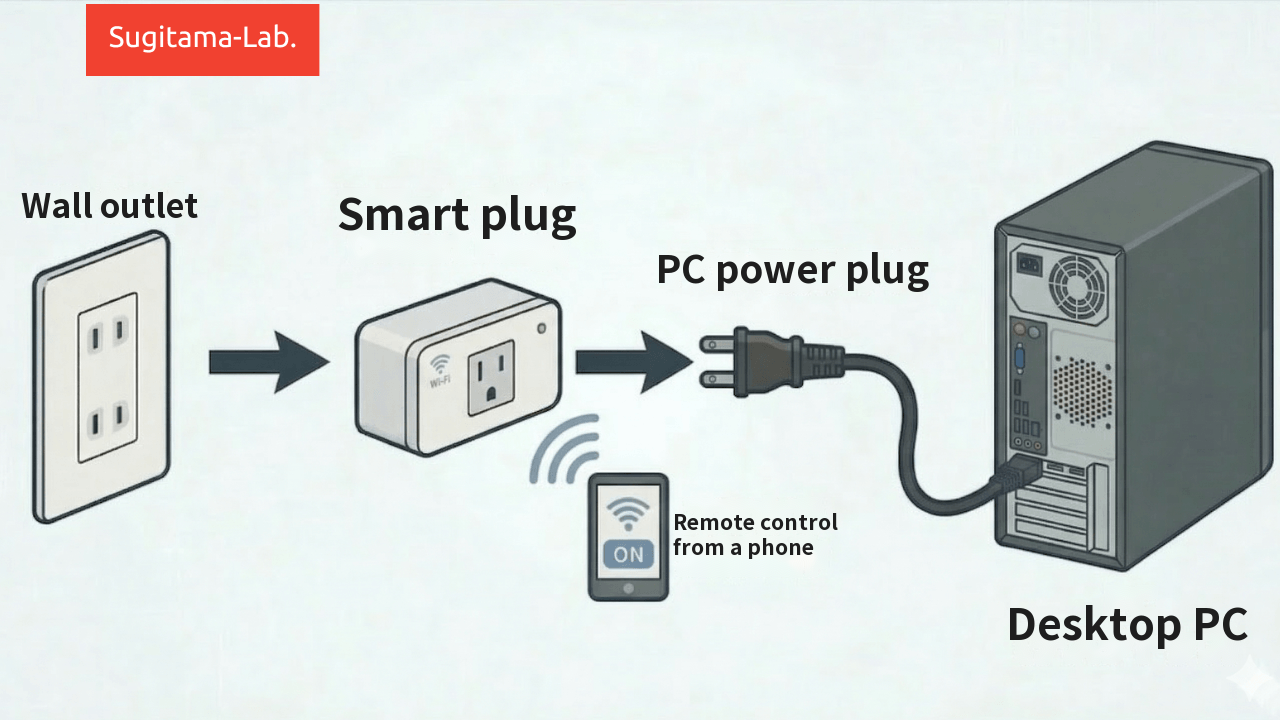
Many desktop PCs have a function that starts the PC automatically when power returns after it has been cut, such as in a power outage. We use that function.
- Put a smart plug between the PC and the wall outlet.
- From wherever you are, turn the smart plug ON with its smartphone app.
- Power flows to the PC, the PC decides that power has been restored after an outage, and it starts up by itself.
BIOS Settings
To use this function, you need to change a setting in the BIOS (also called UEFI) of the workstation. Check that your PC has this option before you buy a plug. It may be named differently, such as "After Power Loss" or "AC Recovery."
- Turn on the PC and, while the maker’s logo is showing, press the F2 or Delete key repeatedly to enter the BIOS screen. (The key differs by model and maker, so check the PC maker’s website for details.)
- Look for a tab such as Power Management.
- Find an item such as AC Power Loss Recovery or Restore on AC Power Loss, and change the setting to Power On (or Always On or Last State, depending on the PC).
- Save the settings and exit the BIOS.
If your PC starts too fast to catch the key, on Windows 11 you can open the BIOS from Settings → System → Recovery → Advanced startup → Restart now, then Troubleshoot → Advanced options → UEFI Firmware Settings.
Now you are ready. Turn the PC on from your phone, wait a few minutes, and connect with Remote Desktop over Tailscale. With this flow, you can start working anytime, anywhere.
- Set up the smart plug following its maker’s instructions, and make sure you can switch it from your phone using mobile data, not only your home Wi-Fi.
- Shut down the PC, turn the plug off, then turn it on from your phone and confirm that the PC starts by itself.
- From another PC or network, connect with Remote Desktop over Tailscale, and check that it also works after the PC has restarted without anyone signing in.
All of these steps need physical access to the home PC, so do them while you are still at home.
A Smart Plug Also Helps with Security
Physically cutting the power to the PC with a smart plug is also a good security measure.
A PC that is always connected to the internet and waiting in sleep mode can never be made completely risk-free, however well you defend it with a VPN.
But if you turn off the power at the source with the smart plug, nobody can reach the PC from outside while it is off.
To protect confidential data, I think that cutting the power when you are not using the PC is a very simple and very safe way to operate it.
Note that the smart plug itself is controlled through an app account, so protect that account with a strong password and two-step verification too.
Tip: When you finish working, always shut down from the Windows Start menu. Turn the smart plug OFF only after the PC has finished shutting down completely.
How to Choose a Smart Plug
Many smart plugs are on sale, but there are two things to check when you use one with a high-spec PC such as a workstation.
- Its rating must be clearly higher than what the PC needs. Check the input rating (amps or watts) on the label of the PC’s power supply, and choose a plug whose rated current and wattage are clearly above it for your local mains voltage. A plug rated too low may cut out or overheat when the PC starts up or runs under heavy load. Choose a plug that carries a safety certification recognized in your country.
- It should show power consumption (wattage). When you turn the plug on from a distance, watching the reading in the app rise from 0 W to something like 80 W tells you the PC has started.
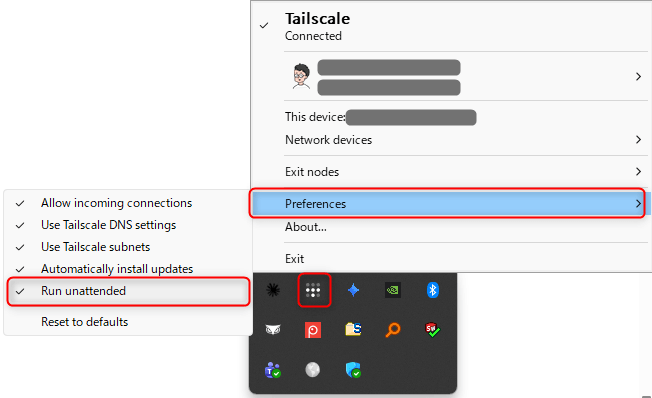
If the PC may restart or be powered on while nobody is signed in to Windows (for example, when you start it remotely with a smart plug, or after a Windows update restart), you need to set Tailscale to "Run unattended."
With the default settings, Tailscale starts in the background when you sign in to Windows.
So when the PC has only just been powered on, Tailscale is not running yet, and a Remote Desktop connection fails because the PC cannot be found.
With "Run unattended" enabled, Tailscale keeps running in the background even before sign-in, so you can connect with Remote Desktop from the Windows sign-in screen.
Right-click the Tailscale icon in the system tray (it may be hidden under the ^ arrow), point to Preferences, select Run unattended, and select Yes when the app asks. A check mark appears next to the item when it is on.
Summary
This article explained how to use SOLIDWORKS while working remotely, getting the most out of the high-performance environment you already own, without buying an expensive mobile workstation.
The main extra item you need is a smart plug, which you use to turn the PC on remotely.
If your PC at home runs the Home edition, you also need to pay for the upgrade to Pro, but the total cost should still be much lower than that of a mobile workstation.
Tailscale, the core of the network, is free to try.
Why not start by installing Tailscale this weekend? Your options for how you work could widen a lot.
Thank you for reading to the end.






Pros: High performance anywhere, and no dependence on an internet connection.
Cons: The PC is heavy, expensive, and drains the battery quickly.
Pros: It runs in a browser, so an ordinary laptop is enough.
Cons: The usability and functions differ from the desktop version, and moving your existing data takes effort.
Pros: You keep using your familiar PC environment and data, and the PC you carry can be low-spec.
Cons: How comfortable it feels depends on the speed of your internet connection.